

|
| (Documentation for the EXPERT Set menu) |

|
|
|
|
| (to DFSee main pages) | File | Edit | Actions | Image | View | Scripts | Set | Help | (to BASIC menu) |
| Mode=FDISK | APFS | AUX | DUMPFS | EXTn | EFAT | FAT | HFS+ | HPFS | ISO | JFS | NTFS | REISER | SWAP | XFS |

Browser shows HIDDEN items (Name starts with '.' or SYSTEM/HIDDEN attribute)
    This menu items allows toggling the option to either SHOW any
    HIDDEN directories or files or to leave them out of the listed
    files in the DFSee Browser, the default is to SHOW them.

    What 'hidden' directories or files are, depends on the filesystem:

       Most Linux / macOS : File/dir names starting with a '.' character

       Dos/Windows/OS2 etc: File/Dir with a SYSTEM or HIDDEN attribute

    This option can be set from the SET menu, or the Browse startup-dialog
    and once in the browser, <F11> toggles this setting

    - - - - - - - - - - - - - - - - - - - - - - - - - - - - - - - - - - - - - - - - - -
    Press <F1> again for more help; Some options may require switching to 'Expert mode'
NO questions asked, automatic YES to confirmations. See 'batch' command help

    This will toggle the 'Batch' status for DFSee, that auto-answers
    all confirmations with 'Yes', allowing batch-wise operation most
    useful from scripts

    When set to ON, it will automatically answer all confirmations
    with 'Yes', allowing batch-wise operation, which is useful
    from recovery or partitioning scripts

    - - - - - - - - - - - - - - - - - - - - - - - - - - - - - - - - - - - - - - - - - -
    Press <F1> again for more help; Some options may require switching to 'Expert mode'
NO writing to opened objects for safety, do allow writing log or image-files

    This will toggle the 'Read-Only' status for ALL objects that
    might be opened using DFSee. The current status is indicated
    in the menu itself, in the first column for the menu-item.

    When set to Read-Only, no changes are allowed that write to
    the opened object. This will save you from unintended actions
    that could cause problems.

    Writing to normal files like logfiles and imagefiles is still
    possible, so you can make imagebackups, or PSAVE backups  even
    when working Read-Only.

    - - - - - - - - - - - - - - - - - - - - - - - - - - - - - - - - - - - - - - - - - -
    Press <F1> again for more help; Some options may require switching to 'Expert mode'
Ignore read/write and other errors, continue operation with next sector(s)

    This will toggle the ERROR Strategy setting, that controls the way
    read- write- and other low level errors are handled while performing
    operations like WIPE, CLONE, IMAGE, RESTORE and similar commands.

    When 'checked' the error strategy is IGNORE, meaning errors are ignored,
    and any non-zero returncodes will be suppressed (made 0) so they will NOT
    surfeace in a script.

    When 'unchecked', the ERROR strategy is either CONFIRM (user confirmation)
    or it is QUIT, in which case the running operation will be aborted and the
    non-zero returncode surfaces to the script or DFSee user-interface level.

    The startup default (Strategy CONFIRM) can be changed using the startup
    '-E:i' or '-E:q' switch, it can be overridden just for the  CURRENT command
    using the option '-E:i' or '-E:q' with that command, and finally the global
    strategy can be modified on-the-fly using the 'SET ERROR confirm/ignore/quit'
    command from the commandline or a script

    You can put a command like 'set error quit' in your profile.dfs to
    set the error strategy without a startup-switch when starting DFSee.

    - - - - - - - - - - - - - - - - - - - - - - - - - - - - - - - - - - - - - - - - - -
    Press <F1> again for more help; Some options may require switching to 'Expert mode'
Automatic interpretation of GPT-style disks, hiding the 0xEE protective MBR

    This will toggle the 'gptAuto' setting, that controls the way
    the partitiontables for GPT style disks are interpreted by DFSee.

    When 'checked' gptAuto is ON, and the actual GPT-style partitions
    will be retrieved from the GPT database and displayed in DFSee.
    This is the most useful way of looking at it, and is the default.

    When 'unchecked', gptAuto is OFF, and the GPT databse in ignored!
    Instead the 'protective MBR' entry in the regular tables is shown.

    The startup default (gptAuto ON) can be changed using the
    startup '-gptauto-' switch, and can be modified on-the-fly
    using the 'SET GPTAUTO on/off' command, as this menu does.

    You can put a command like 'set gptauto OFF' in your profile.dfs to
    disable this feature without a startup-switch when starting DFSee.

    - - - - - - - - - - - - - - - - - - - - - - - - - - - - - - - - - - - - - - - - - -
    Press <F1> again for more help; Some options may require switching to 'Expert mode'
Get disk geometry from disk contents (tables and LVM) instead of the OS/BIOS
    This will toggle the 'geocalc' setting, that controls the way
    the disk geometry to use for each disk is determined by DFSee.

    When 'checked' geocalc is ON, and disk geometry is calculated
    from the actual disk contents like partition tables and LVM info.
    This is often the most reliable way, and is the default.

    When 'unchecked', geocalc is OFF, and disk geometry is queried
    directly from the operating system (or the BIOS for DFSDOS).
    You may need this in situations where the disk-contents does NOT
    represent the desired disk geometry, including the disk size.
    This may happen with disk damage (garbage contents) or when
    the disk is cloned/imaged from a different size disk.

    Note: Unchecking the 'geocalc' setting, and using the menu item:

          Mode=FDISK ->
           OS/2 LVM and BootManager ->
            Set LVM-Geo to DFSee L-Geo ->
             ... select disk to be updated

          Will update the new disk size after a disk-to-disk clone for
          disks that have LVM information on them (in eCS, OS/2 4.50).

    The startup default (geocalc ON) can be changed using the
    startup '-geocalc-' switch, and can be modified on-the-fly
    using the 'SET GEOCALC on/off' command, as this menu does.

    You can put a command like 'set geocalc OFF' in your profile.dfs to
    disable this feature without a startup-switch when starting DFSee.

    - - - - - - - - - - - - - - - - - - - - - - - - - - - - - - - - - - - - - - - - - -
    Press <F1> again for more help; Some options may require switching to 'Expert mode'
Always sync LVM Driveletters to LVM Engine; Avoids reboot, may cause traps!!

    This will toggle the 'SyncLVM' setting, that controls the automatic
    synchronisation of the OS/2 LVM-Engine with new DFSee information.

    When 'checked' SyncLVM is ON, and all changes to driveletters etc
    are passed on to the LVM-Engine dynamically, without the need to
    reboot the system to make changes visible.

    WARNING: Synchronising LVM information from DFSee to the LVM Engine
             is known to cause TRAPS on some systems, most often when
             REMOVABLE media are present (like USB disks/memory sticks)

             Because of this, using it is NOT RECOMMENDED!

    When 'unchecked', SyncLVM is OFF, and you need a system reboot before
    any change to driveletters of volumenames is visible in LVM and the
    rest of the operating system. For safety reasons, this is the default.

    The startup default (SyncLVM OFF) can be changed using the
    startup '-synclvm' switch, and can be modified on-the-fly
    using the 'SET SYNCLVM on/off' command, as this menu does.

    You can put a command like 'set synclvm ON' in your profile.dfs to
    enable this feature without a startup-switch when starting DFSee.

    - - - - - - - - - - - - - - - - - - - - - - - - - - - - - - - - - - - - - - - - - -
    Press <F1> again for more help; Some options may require switching to 'Expert mode'
Include diskettes, Floppy A: or B: in volumelists, used in menus and dialogs

    This will toggle the 'floppy' setting, that determines if diskettes
    are included in the volume/driveletter lists in menus and dialogs.

    Having diskettes in those lists can cause delays of several seconds
    when presenting the main DFSee menu.

    The startup default ('floppy' OFF) can be changed using the
    startup '-floppy' switch, and can be modified on-the-fly
    using the 'SET FLOPPY on/off' command, as this menu does.

    You can put a command like 'set floppy ON' in your profile.dfs to
    enable this feature without a startup-switch when starting DFSee.

    - - - - - - - - - - - - - - - - - - - - - - - - - - - - - - - - - - - - - - - - - -
    Press <F1> again for more help; Some options may require switching to 'Expert mode'
Automatically number logfiles as name001..999, added to filename from dialog
    This will toggle the 'logAuto' setting, that controls the way the
    name for the logfile specified in the LOG dialog screen is handled.

    When 'checked' logAuto is ON, and a sequence number from 001 to 999
    will be appended to the specified filename, incrementing it each time
    a log is started (typically at DFSee startup).

    When 'unchecked', logAuto is OFF, and the filename is unchanged.
    (unless modified by the logDate setting)

    The startup default (logAuto OFF) can be changed using the
    startup '-logauto' switch, and can be modified on-the-fly
    using the 'SET LOGAUTO on/off/num/date' command, as this menu does.

    You can put a command like 'set logauto NUM' in your profile.dfs to
    enable this feature without a startup-switch when starting DFSee.

    - - - - - - - - - - - - - - - - - - - - - - - - - - - - - - - - - - - - - - - - - -
    Press <F1> again for more help; Some options may require switching to 'Expert mode'
Automatically add '-YYYMMDD' DATE postfix string to log filename from dialog
    This will toggle the 'logDate' setting, that controls the way the
    name for the logfile specified in the LOG dialog screen is handled.

    When 'checked' logDate is ON, and a DATE string formatted -YYYYMMDD
    will be appended to the specified filename, causing a SINGLE logfile
    unique for that one day, to be be created or appended to

    When 'unchecked', logDate is OFF, and the filename is unchanged.
    (unless modified by the logAuto setting, or manual ~N substitues)

    The startup default (logDate OFF) can be changed using the
    startup '-logdate' switch, and can be modified on-the-fly
    using the 'SET LOGAUTO on/off/num/date' command, as this menu does.

    You can put a command like 'set logauto DATE' in your profile.dfs to
    enable this feature without a startup-switch when starting DFSee.

    - - - - - - - - - - - - - - - - - - - - - - - - - - - - - - - - - - - - - - - - - -
    Press <F1> again for more help; Some options may require switching to 'Expert mode'
Handle primary partition table type 0x00 as a valid partition, not freespace
    This will toggle the 'pt0' setting, that controls the way type 0x00
    entries in the MBR partition table for primaries is handled.

    When 'checked' pt0 is ON, and type 0x00 entries are handled as PARTITIONS
    allowing all sorts of manipulation of such 'hidden' partitions/filesystems.
    Note that for a type 0x00 entry to show up, it MUST have a valid size and
    start-location in the partition table!

    Also note that as long as the 'pt0' setting is ON, you will not be able to
    create a partition in this 'freespace', since it is seen as a partition

    When 'unchecked' (the default), pt0 is OFF, and type 0x00 entries are
    seen as regular FREESPACE, available for creation of new partitions.

    Type 0x00 'partitions' are useful to HIDE such areas (temporarily) for
    the operating system, so it does not get mounted/attached or locked as
    long as it is being manipulated (by DFSee :)

    - - - - - - - - - - - - - - - - - - - - - - - - - - - - - - - - - - - - - - - - - -
    Press <F1> again for more help; Some options may require switching to 'Expert mode'
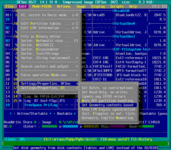
Adapt window size, Set color-scheme/palette; Show Kbd/Mouse generated codes
    This menu contains a few selections that change the
    appearance and behaviour of the DFSee user interface.
    Changes made in this menu will only affect the current
    DFSee session. On the next startup of the program the
    default settings will be active again.

    - - - - - - - - - - - - - - - - - - - - - - - - - - - - - - - - - - - - - - - - - -
    Press <F1> again for more help; Some options may require switching to 'Expert mode'
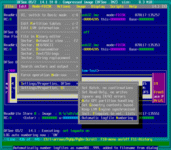
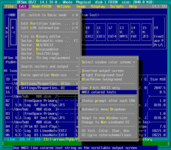
Select and set number of available colors, B/W or 16 from a larger palette
    This will present a menu with the available number of colors
    both for the windowing system as the output-window itself.

    It will be either MONOCHROME, with 1 foreground, 1 background color,
    or 16 FG on 8 or 16 BG colors, from a palette of 16
    The current number of colors will be highlighted on opening the menu.

    Use the '-C:xxx' EXE switch to start with a specific nr of colors.

    - - - - - - - - - - - - - - - - - - - - - - - - - - - - - - - - - - - - - - - - - -
    Press <F1> again for more help; Some options may require switching to 'Expert mode'
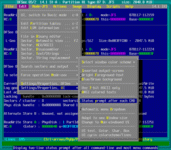
Selection of this item leads to a dynamic created submenu, to select a color palette to be used
Select and activate any of the available window-color schemes

    This will present a menu with the available color schemes to be used
    for all the windowing parts of the user interface.

    It does NOT change the colors used in the main output window!

    The current color scheme will be highlighted on opening the menu.

    Use the '-scheme:xxx' EXE switch to start with a specific scheme.

    - - - - - - - - - - - - - - - - - - - - - - - - - - - - - - - - - - - - - - - - - -
    Press <F1> again for more help; Some options may require switching to 'Expert mode'
Selection of this item leads to a dynamic created submenu, to select a colorscheme to be used
Re-initialize the DFSee windowing system to use the full (resized) window
    This will re-initialize the windowing component in DFSee to take
    advantage of a new, probably larger, OS window size.

    On Windows, it is useful after changing window 'properties' manually

    You can also resize and initialize in one go by using a command like:

            mode  90,45

    directly from the DFSee command-line.

    - - - - - - - - - - - - - - - - - - - - - - - - - - - - - - - - - - - - - - - - - -
    Press <F1> again for more help; Some options may require switching to 'Expert mode'
Re-initialize DFSee, using a simple command-driven non-windowed interface

    This will change the user-interface to e very simple command-driven
    one without any output scrolling. Commands may be typed, and resulting
    output will be displayed but scrolls off the screen eventually.

    You can also startup in this mode by using the switch '-w-'.

    - - - - - - - - - - - - - - - - - - - - - - - - - - - - - - - - - - - - - - - - - -
    Press <F1> again for more help; Some options may require switching to 'Expert mode'
Cycling of color-scheme/line-styles using arrow keys, terminated with ENTER
    Change appearance of the user interface using:

         - Arrow-key UP/DOWN:    change overall color scheme

         - Arrow-key LEFT/RIGHT: change output-window colors

         - Page Up / Page Down:  change line-style scheme

   Note: Also activated with Shift+<F12> when the menu is open.

    - - - - - - - - - - - - - - - - - - - - - - - - - - - - - - - - - - - - - - - - - -
    Press <F1> again for more help; Some options may require switching to 'Expert mode'
Test UI, displaying ANSI color-set, character-set and Box-drawing characters
    Check display of the following UI scrollbuffer capabilities:

      COLORS      PC/ANSI color set, 16 foreground/background colors

      CHARSET     Display all possible (256) ASCII codepoints

      CBOXES      Display pseudo-graphics using 'box' characters

    - - - - - - - - - - - - - - - - - - - - - - - - - - - - - - - - - - - - - - - - - -
    Press <F1> again for more help; Some options may require switching to 'Expert mode'
Test UI, detection of keyboard and mouse activity incl Esc-sequences on UNIX
    Test generated (DFSee/Txlib) keyboard codes and mouse response

    Will display a keycode for each key pressed, with the TxLib/DFSee
    assigned name for that key, or 'unknown' as well as a timstamp in
    seconds from the start of the program.

    For the mouse it shows the X and Y char position (top left is 0 0),
    the mousebutton pressed and the state of the modifiers  (Ctrl/Alt)
    and the timestamp, followed by '(DBLCLK)' if the click was within
    the double-click time

    - - - - - - - - - - - - - - - - - - - - - - - - - - - - - - - - - - - - - - - - - -
    Press <F1> again for more help; Some options may require switching to 'Expert mode'
Right-Mouse-Button click opens main/popup menu by simulating
File dialogs show HIDDEN items (Name starts with '.' or SYSTEM/HIDDEN attr)
Use inverted colors on the scrollable output screen
Use bright foreground colors only on the scrollable output screen
Use blue (or brown inverted) background instead of classic black or white
Use 7-bit ASCII character only, avoid non-standard 'drawing chars'
Use ANSI-like colored text string on the scrollable output screen
Display two-line status prompt after all command-line and most menu commands
Automatically open menu pulldown on selecting menu-heading in the MenuBar
Only automatically Drop-down on MOVING between menus, not
Right-arrow moves to next Dropdown menu, open submenu requires an

    This menu items allows toggling the option to either SHOW any
    HIDDEN directories or files or to leave them out of the listed
    files in the File Dialogs, the default is to HIDE them.

    What 'hidden' directories or files are, depends on the operating system:

       Most Linux / macOS : File/dir names starting with a '.' character

       Dos/Windows/OS2 etc: File/Dir with a SYSTEM or HIDDEN attribute

    This option can be set from the SET menu, and once in a File-Dialog,
    <F11> toggles this setting

    - - - - - - - - - - - - - - - - - - - - - - - - - - - - - - - - - - - - - - - - - -
    Press <F1> again for more help; Some options may require switching to 'Expert mode'
Fdlgs, show hidden Dirs/Files
From main menu: Set -> Fdlgs, show hidden Dirs/Files
    This menu items allows toggling the option to either SHOW any
    HIDDEN directories or files or to leave them out of the listed
    files in the File Dialogs, the default is to HIDE them.

    What 'hidden' directories or files are, depends on the operating system:

       Most Linux / macOS : File/dir names starting with a '.' character

       Dos/Windows/OS2 etc: File/Dir with a SYSTEM or HIDDEN attribute

    This option can be set from the SET menu, and once in a File-Dialog,
    <F11> toggles this setting

    - - - - - - - - - - - - - - - - - - - - - - - - - - - - - - - - - - - - - - - - - -
    Press <F1> again for more help; Some options may require switching to 'Expert mode'
Inverted output-screen
From main menu: Set -> Inverted output-screen

    This will invert ALL colors used in the text-output window.
    Both background and foreground colors are affected.

    The resulting colors also depend on other settings like the
    background black/blue and the bright-foreground setting.

    Note that the colors used in the rest of the application like
    menus and dialog windows does NOT change with this setting.

    - - - - - - - - - - - - - - - - - - - - - - - - - - - - - - - - - - - - - - - - - -
    Press <F1> again for more help; Some options may require switching to 'Expert mode'
Bright Foreground-text
From main menu: Set -> Bright Foreground-text
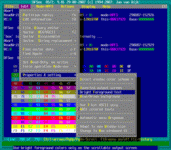
    This will make any low-intensity color used as foreground to
    be changed to high-intensity (bright colors).

    The setting is most useful on lighter (inverted) backgrounds.

    Note that the colors used in the rest of the application like
    menus and dialog windows does NOT change with this setting.

    - - - - - - - - - - - - - - - - - - - - - - - - - - - - - - - - - - - - - - - - - -
    Press <F1> again for more help; Some options may require switching to 'Expert mode'
Blue/Brown background
From main menu: Set -> Blue/Brown background
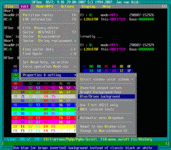
    This toggles between a default Black or Blue background color.
    The default foreground color in both cases will remain white.

    When combined with the 'Inverted output-screen' setting, it will
    toggle between white (inverted black) and brown (inverted blue).

    Note that the colors used in the rest of the application like
    menus and dialog windows does NOT change with this setting.

    - - - - - - - - - - - - - - - - - - - - - - - - - - - - - - - - - - - - - - - - - -
    Press <F1> again for more help; Some options may require switching to 'Expert mode'
Use 7-bit ASCII only
From main menu: Set -> Use 7-bit ASCII only

    This will restrict the use of ASCII characters to the range
    of 0 through 127 decimal.  This may avoid problems re-using
    the text through cut-and-paste (to email or word-processor).

    The setting is NOT needed to get a 'clean' logfile, since the
    logfile in DFSee is 7-bit ASCII by default.

    - - - - - - - - - - - - - - - - - - - - - - - - - - - - - - - - - - - - - - - - - -
    Press <F1> again for more help; Some options may require switching to 'Expert mode'
ANSI colored texts
From main menu: Set -> ANSI colored texts
    This will avoid the use of ANSI escape-sequences to be used
    in the output-screen, avoiding possible problems when re-using
    the text via the clipboard or otherwise.

    The setting is NOT needed to get a 'clean' logfile, since the
    logfile in DFSee is cleaned from ANSI sequences by default.

    Also when using the DFSee clipboard integration (Alt-C), the
    ANSI codes are stripped automatically as well

    - - - - - - - - - - - - - - - - - - - - - - - - - - - - - - - - - - - - - - - - - -
    Press <F1> again for more help; Some options may require switching to 'Expert mode'
Status Prompt after each CMD
From main menu: Set -> Status Prompt after each CMD
    This toggles the display of the 3..4 line prompt after every command
    executed from the command-line or from most of the menu selections.

    These lines contain the returncode for the last command executed,
    and some related sector numbers for 'likely interesting' sectors.

    When switched off, there are 3 to 4 more lines of information that
    fit on the screen, which could be very useful to show larger amounts
    of data (like whole sector HEX-dumps) without having to scroll back.

    - - - - - - - - - - - - - - - - - - - - - - - - - - - - - - - - - - - - - - - - - -
    Press <F1> again for more help; Some options may require switching to 'Expert mode'
Automatic Menu Dropdown
From main menu: Set -> Automatic Menu Dropdown
    This toggles the automatic opening of pull-downs from the main menu.

    When ON, each menu-heading selected on the menubar will automatically
    be opened, expanding to a list of menu-choices.
    This is the default, unless -M:2 is given at startup

    When OFF, the menu-heading selected will be highlighted but requires
    another <Enter> or <Down> key to open.
    This can be set at startup using the '-M:2' switch.

    - - - - - - - - - - - - - - - - - - - - - - - - - - - - - - - - - - - - - - - - - -
    Press <F1> again for more help; Some options may require switching to 'Expert mode'
Delayed (auto) Dropdown
From main menu: Set -> Delayed (auto) Dropdown

    This toggles the delayed opening of pull-downs from the main menu.

    When ON, automatic dropdown only works when MOVING between menuitems
    not on initial activation with the <F10> key or a mouse-click
    This can be set at startup using the '-M:4' switch.

    When OFF, automatic dropdown works on initial activation AND moving
    This is the default, unless -M:4 is given at startup

    - - - - - - - - - - - - - - - - - - - - - - - - - - - - - - - - - - - - - - - - - -
    Press <F1> again for more help; Some options may require switching to 'Expert mode'
Right moves to next Dropdown
From main menu: Set -> Right moves to next Dropdown

    This toggles the behaviour of the Right-Arrow key on submenus.

    When ON, the Right-Arrow key, when at a submenu, will NOT open that,
    but instead MOVE RIGHT to the next dropdown menu. To open the submenu
    an explicit <Enter> keypress is needed
    This behaviour can be set at startup using the '-M:1' switch.

    When OFF, the Right-Arrow key opens a submenu directly.
    This is the default, unless -M:1 is given at startup

    - - - - - - - - - - - - - - - - - - - - - - - - - - - - - - - - - - - - - - - - - -
    Press <F1> again for more help; Some options may require switching to 'Expert mode'
PHP and HTML created by : TX-library 7.00 2021-02-28 (c) 1995-2021: Fsys Software
For application : DFSee OS/2 17.0 2022-10-22; (c) 1994-2022: Jan van Wijk with button/indicator: Expert
(to DFSee main pages)
|
File
|
Edit
|
Actions
|
Image
|
View
|
Scripts
|
Set
|
Help
|
(to BASIC menu)
Mode=FDISK
|
APFS
|
AUX
|
DUMPFS
|
EXTn
|
EFAT
|
FAT
|
HFS+
|
HPFS
|
ISO
|
JFS
|
NTFS
|
REISER
|
SWAP
|
XFS
(Set page)
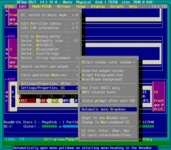
DFSee menu documentation for pulldown : Set
Views:
625750
![]()
Created by Jan van Wijk: Aug 2007, last update: 23-Oct-2022
![]()